


This comprehensive guide delves into the detailed table saw paddle switch replacement process. Highlighting the importance of adhering to schematics, we explore wiring connections and grounding details and discuss compatibility with different voltage levels. With an emphasis on safety, we also explore post-installation testing and when to seek professional assistance. Serving as a resource for those committed to efficient operation and security, we provide tips and recommendations for this crucial task.
Table Saw Paddle Switch Replacement: Wiring, Safety, and Tips
- Understanding the importance of paddle switch replacement for table saws
- Comprehending the schematics and wiring connections
- Proper grounding techniques and secure attachment of wires
- Power flow analysis for effective operation and safety
- Considering alternative wiring approaches and their pros and cons
- Implementing electrical safety measures during installation
- Navigating compatibility with voltage levels for switch functionality
- Conducting post-installation testing to ensure proper functionality
- Seeking professional assistance when unsure or uncomfortable
- Adhering strictly to provided schematics for successful installation
Key Takeaways
- The paddle switch replacement for a table saw is an affordable and effective option.
- It is essential to understand the schematic and wiring of the switch before attempting to replace it.
- Proper grounding and wiring connections are crucial for the safety and proper functioning of the switch.
- While alternative approaches may exist, following the provided schematic is recommended for installation and electrical safety.
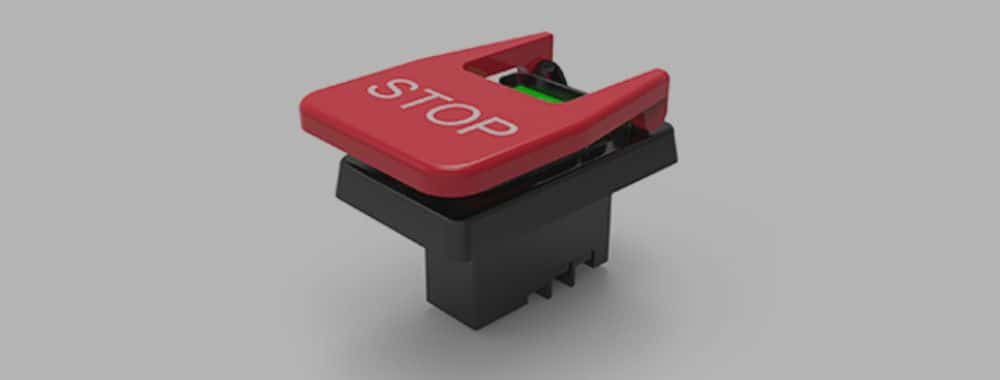
Understanding Paddle Switch Replacement
Why is understanding the intricacies of paddle switch replacement crucial for successfully operating and maintaining your table saw? The paddle switch benefits are multifaceted, enhancing safety, functionality, and ease of use. Comprehending the installation process helps preserve the Longevity of your table saw and ensures that safety measures are not compromised. The installation process of a paddle switch is a meticulous task, requiring a detailed understanding of the switch mechanism, the layout of the wiring, and the correct tools for the job. An adequately installed paddle switch ensures a swift shut-off during emergencies, providing an added layer of safety and control. Therefore, mastering the art of paddle switch replacement is a valuable skill for anyone aiming to serve others through table saw operation and maintenance.
Deciphering Schematics and Wiring
How does one accurately decipher the schematics and correctly wire a table saw paddle switch? The process hinges on a clear understanding of schematic interpretation and the application of precise wiring techniques. The first step is to:
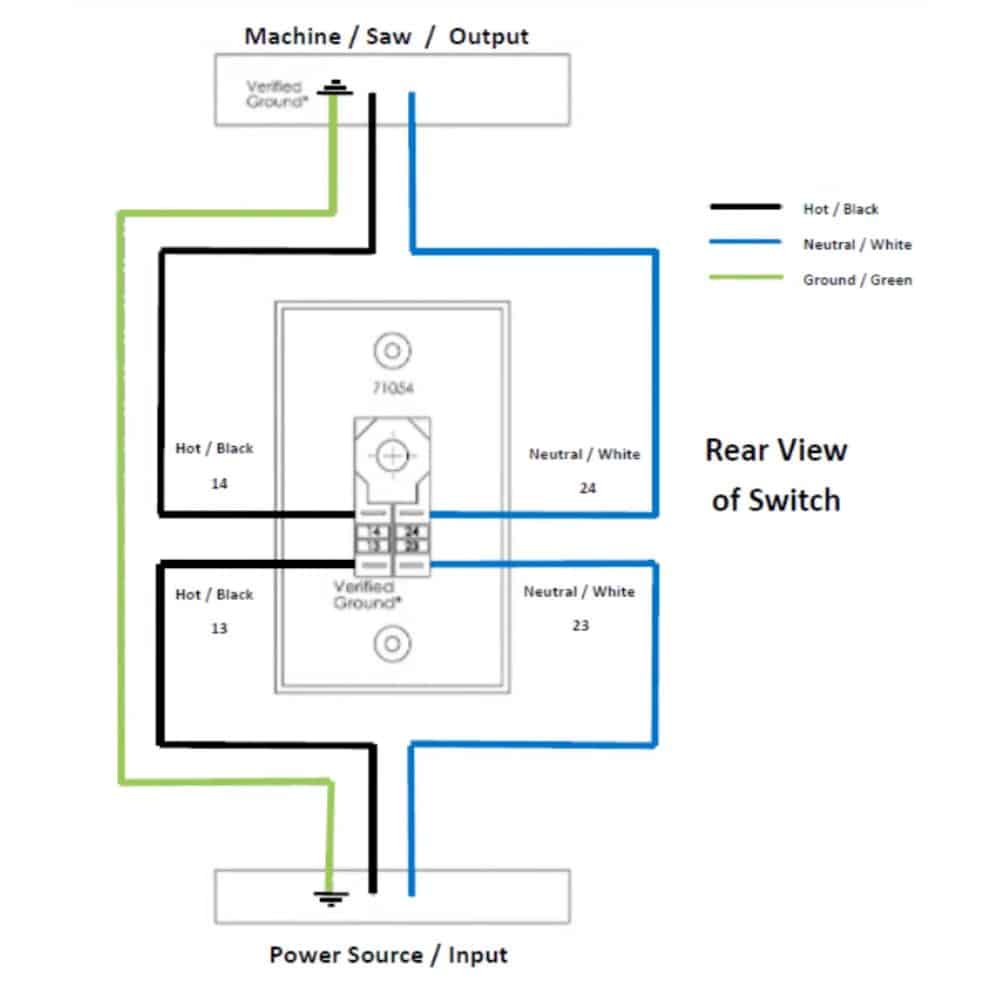
- Review the wiring schematic carefully, noting the various symbols and their meanings.
- Identify the hot, neutral, and ground wires in your table saw, as these will need to be connected to the corresponding terminals on the paddle switch.
- Respect the color coding of the wires, as this aids in proper installation and prevents potential mix-ups.
- Ensure all connections are secure and insulated to prevent accidental shocks or malfunctions.
Grounding and Wiring Details
In grounding and wiring a table saw paddle switch, the first critical step involves securely tying together the green wires for adequate grounding. This is a fundamental part of grounding techniques, ensuring the safety of the machine and operator.
Next, the proper wiring techniques come into play. This involves the correct placement and secure attachment of the white and black wires, which are the neutral and hot wires.
| Wire | Function |
|---|---|
| Green | Grounding |
| White | Neutral |
| Black | Hot |
Power Flow in Circuits
Understanding the power flow through the circuits when the switch is turned on is essential for the effective operation and safety of the table saw. A well-executed power flow analysis can provide insights into the circuit behavior, helping you to avoid potential hazards and maintain efficiency.
- When the switch is turned on, power enters the circuit via the hot (black) wire.
- The current flows to the saw’s motor, providing the energy to cut the material.
- After that, the power returns to the source through the neutral (white) wire.
- The power flow ceases when the switch is off, ensuring user safety.
Alternative Wiring Approaches
Considering alternative wiring approaches, it’s essential to acknowledge that there may be varied methods to connect the paddle switch, each with advantages and drawbacks. For instance, one could wire the controller directly to the power source or through a separate circuit. The different wiring methods can affect the Longevity of the control and the ease of installation. Additionally, the button’s location about the power source might necessitate a different approach. Each method has pros and cons, and it is crucial to understand these before deciding on the path to use. Always prioritize safety and consult with a professional if unsure about the wiring process.
Electrical Safety Measures
Implementing electrical safety measures is critical for any wiring project, particularly when installing a table saw paddle switch. Understanding electrical safety is paramount to ensure the user’s safety and the device’s efficiency.
- Never handle wiring or conduct electrical work while the equipment is connected to a power source. Always disconnect before starting any work.
- Proper grounding techniques are essential. The ground wire, usually green or bare, should securely attach to the ground terminal.
- Use a multimeter to verify the absence of voltage before starting the wiring process.
- Regularly inspect your equipment for damaged wires or loose connections.
Compatibility With Voltage Levels
Navigating the compatibility of your table saw paddle switch with different voltage levels is a critical step in the replacement process. It’s crucial to comprehend how voltage compatibility can impact switch functionality. Voltage levels pertain to the electrical force required to drive a current between two points. Therefore, it’s essential to ensure your paddle switch is compatible with the voltage level of your table saw to prevent any potential damage or malfunction. If the voltage compatibility is inappropriate, it could lead to overheating, underperformance, or even electrical fires. Hence, always verify the voltage levels in the product specifications and compare them with your table saw’s voltage level before replacing them.
Post-Installation Testing
After successfully installing your table saw paddle switch, conducting a series of tests is vital to ensure its proper functionality. This phase, known as post-installation troubleshooting, is critical to detecting and correcting common wiring mistakes that might have been overlooked during installation.
As part of your testing routine, consider the following steps:
- Verify that the switch turns ON and OFF as expected.
- Ensure the paddle can be easily depressed and released.
- Confirm that the saw operates correctly when the button is activated.
- Examine the wiring for loose or improper connections.
Consistent testing not only safeguards the operational integrity of your table saw but also reinforces its safety measures, contributing to a more secure workspace.
Seeking Professional Assistance
Despite a DIY enthusiast’s best efforts, there may be instances where professional assistance is required to ensure the safe and correct installation of a table saw paddle switch. Hiring an electrician is recommended when there is uncertainty about the wiring process, as they possess the required expertise to avoid potential safety hazards.
| Instances Requiring Electrician | Safety Precautions | Tips |
|---|---|---|
| Uncertainty in the Wiring Process | Always disconnect power | Use insulated tools |
| Complex Wiring Schematics | Wear safety glasses | Have a fire extinguisher nearby |
| Installation of new circuits | Work in a well-lit area | Keep workspace tidy |
| Faulty Switch Operation | Don’t touch live wires | Regularly maintain your equipment |
It’s essential to understand that safety precautions must always be followed to avoid accidents, and there’s no shame in seeking professional assistance when needed.
Personal Experience and Recommendations
In my extensive experience with table saw paddle switch replacements, I have found that adhering strictly to the schematic provided with the switch has consistently resulted in successful installations. I’ve noticed a pattern of ineffective practices, which I’ve distilled into a set of personal anecdotes and best practices for those undertaking this task:
- Always follow the schematic: The schematic is your roadmap to a successful installation.
- Test before use: After installation, test the switch before using the saw.
- Prioritize safety: Always disconnect power before beginning the installation process.
- Seek professional help if unsure: Consult a professional if you feel uncomfortable or uncertain during the installation.
Frequently Asked Questions
What Common Signs Indicate a Need for Replacing the Table Saw Paddle Switch?
Common signs indicating a need for replacing the table saw paddle switch include erratic operation, inconsistent power supply, and physical damage to the paddle design. Reduced switch durability may cause the saw to turn off unexpectedly or fail to start. Worn-out or broken paddles may also hinder smooth operation. Regular inspection and timely replacement of the paddle switch enhance safety and ensure optimal performance. Always prioritize safety and proper functioning when servicing others’ equipment.
Is Any Specific Maintenance Required for the Paddle Switch to Ensure Longevity?
To ensure the Longevity of the paddle switch, specific maintenance is required. This includes regular cleaning of the button to remove any dust or debris that may interfere with its operation. Additionally, appropriate component lubrication is crucial to maintain smooth functioning and prevent wear and tear. Always ensure to use safe, non-conductive lubricants. A well-maintained switch not only provides operational efficiency but also contributes to the overall safety of the table saw system.
Can the Paddle Switch Replacement Be Accomplished With Basic Household Tools, or Does It Require Specialized Equipment?
Switch installation requires essential household tools like a screwdriver, pliers, and wire cutters. However, an understanding of electrical wiring is crucial for safety. While specialized equipment isn’t necessarily required, a multimeter can help check voltage and continuity. Always prioritize safety when working with electrical components; consult a professional. This ensures a successful and safe paddle switch replacement process.
What Are the Potential Risks or Hazards Involved in Replacing a Table Saw Paddle Switch Without Professional Assistance?
Replacing a table saw paddle switch without professional assistance can pose several DIY risks. Inexperience can lead to incorrect wiring, potentially damaging the button or causing a hazardous situation. The risk of electric shock is a severe concern. Additionally, mishandling may compromise switch durability, leading to premature failure. Therefore, while such a project can be a rewarding DIY experience, it’s paramount to prioritize safety, ensure you possess the necessary skills, and consult a professional if in doubt.
Are Any Specific Brands or Models of Paddle Switches Recommended for Certain Types of Table Saws?
Paddle switch selection largely depends on the table saw’s specifications and user preference. Regarding durability, brands like Grizzly and Rockler have proven reliable. These manufacturers provide switches known for Longevity and consistent performance. Installation techniques vary but often include securing the button to the table saw housing and accurately connecting the wiring as per the provided schematic. Always ensure proper fitting and secure connections for optimal safety and performance.
Conclusion
In conclusion, replacing a table saw paddle switch involves intricate knowledge of schematics, wiring, and electrical safety measures. Variations in wiring methods and voltage compatibility add complexity to the process. Post-installation testing is crucial to ensure operational efficiency and safety. Professional assistance is advisable for those less familiar with electrical tasks. Adherence to instructions and guidance is paramount to successfully and safely replacing the table saw paddle switch.