


Wiring a 12V LED rocker switch is straightforward, but it’s essential to understand the basics to ensure proper functionality and safety. Here’s a simple guide to help you wire a 12V LED rocker switch.
Tools and Materials Needed:
- 12V LED rocker switch
- 12V power source (e.g., car battery)
- Electrical wires
- Wire stripper/crimper
- Connectors (e.g., spade connectors)
- Multimeter (optional for checking connections)
- Electrical tape or heat shrink tubing
Steps to Wire a 12V LED Rocker Switch:
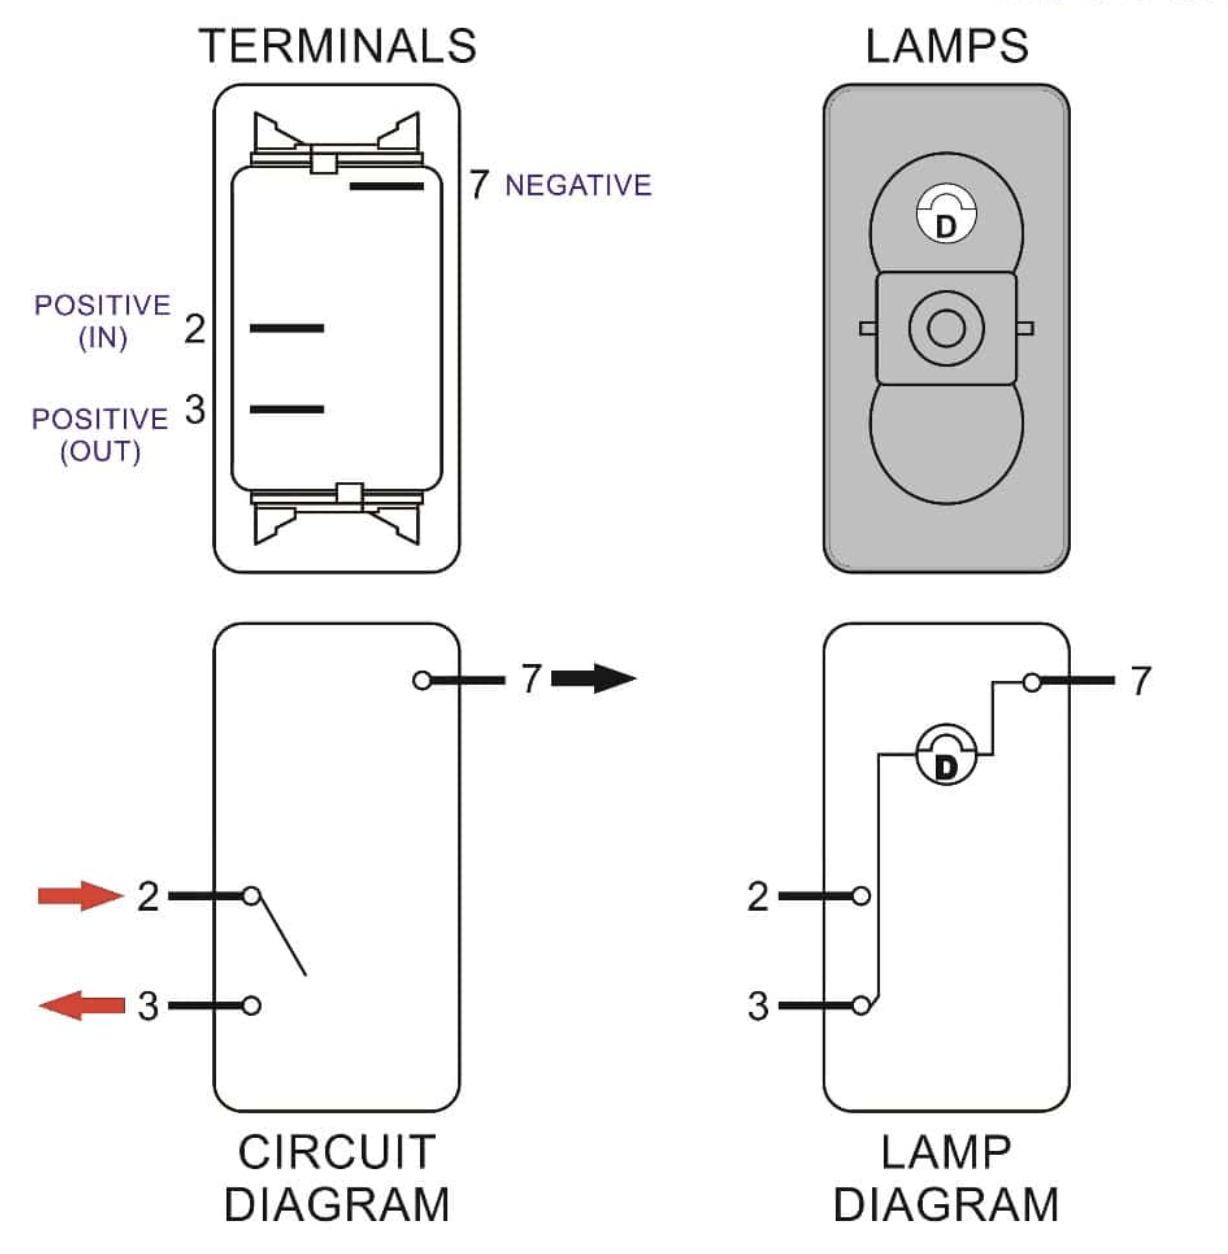
Understanding the Switch Terminals:
A typical 12V LED rocker switch has three terminals:
- Power Input (Power, Load, or Supply): Connects to the 12V power source.
- Accessory Output (Load): Connects to the device you want to control (e.g., light, fan).
- Ground (Earth): Connects to the ground.
Wiring Process:
- Identify the Terminals:
- Check the switch for terminal markings or refer to the switch diagram/manual.
- The terminals are often labeled as Power (P), Load (L), and Ground (G).
- Prepare the Wires:
- Cut the wires to the required length.
- Strip about 1/4 inch (6mm) of insulation from the ends of the wires.
- Connect the Power Source:
- Connect one wire from the 12V power source (positive terminal) to the Power Input terminal on the switch.
- Use a spade connector to ensure a secure connection.
- For safety, you can install an inline fuse between the power source and the switch.
- Connect the Load (Accessory):
- Connect one wire from the Load terminal on the switch to the positive terminal of the device you want to control.
- Ensure the connection is secure using a spade connector.
- Ground Connection:
- Connect a wire from the Ground terminal on the switch to a suitable grounding point.
- The grounding point can be the negative terminal of the power source or a metal part of the vehicle chassis.
- Connect the Device Ground:
- Connect a wire from the negative terminal of the device to the ground (same grounding point as the switch ground).
- Test the Connections:
- Once all connections are made, test the switch by turning it on and off to ensure the LED lights up and the device operates correctly.
- Use a multimeter to check the voltage and continuity if necessary.
- Secure the Connections:
- After verifying the connections, use electrical tape or heat shrink tubing to insulate any exposed wires or connectors.
- Secure the wires in place to prevent them from moving or coming loose.
Example Wiring Diagram:


Tips:
- Always disconnect the power source before making any connections to prevent accidental short circuits or shocks.
- Double-check the terminal connections to ensure they match the switch’s diagram or labels.
- If the switch has an LED indicator, it should light up when the switch is turned on, indicating the circuit is complete.
By following these steps, you can wire a 12V LED rocker switch correctly and safely. If you have any specific questions or encounter issues, feel free to ask for further assistance.