Angle grinders are versatile power tools that can be used for a variety of tasks, from cutting and grinding to polishing and sanding. However, like any other tool, they require maintenance and occasional repairs. One common issue with angle grinders is a faulty switch, which can prevent the tool from turning on or off properly.
In this guide, we will provide step-by-step instructions on how to replace an angle grinder switch safely and effectively.
Before attempting to replace the switch on your angle grinder, it is important to understand the potential risks involved in working with power tools. Accidents can happen if proper safety precautions are not taken, so it is crucial to follow all guidelines carefully.
This guide will outline the necessary steps for replacing an angle grinder switch while emphasizing safety measures that should be taken throughout the process. By following these instructions closely, you can ensure that your angle grinder remains in good working condition and avoid any potential hazards associated with improper repairs.
Introduction Angle Grinder Switch Replacement
The angle grinder switch is an essential component of the angle grinder, a versatile power tool used in various metal and construction works.
The switch controls the on/off function of the grinder, providing precision and safety during use.
This guide aims to provide a step-by-step process for replacing a faulty or damaged angle grinder switch.
By following this guide, users can ensure that their grinder remains functional and safe to use, avoiding any potential harm or damage caused by faulty switches.
Briefly explain what an angle grinder switch is and why it is important.
Understanding the function and significance of the component responsible for controlling an essential power tool’s operation is crucial to ensure safe and efficient operation.
In an angle grinder, this component is known as the switch. The switch regulates the flow of electricity from the power source to the motor, which drives the grinding wheel or disc. Without a functioning switch, an angle grinder would be rendered useless.
The importance of a properly functioning angle grinder switch cannot be overstated. It not only ensures safe and reliable operation but also provides greater control over the tool’s speed and torque. Additionally, a faulty switch can cause serious injuries or damage to property if left unaddressed.
Therefore, it is important to have a basic understanding of how an angle grinder switch works and how to replace it when necessary.
Introduce the purpose of the guide.
This section aims to provide a comprehensive overview of the steps involved in the proper maintenance and repair of an essential component in power tools – the angle grinder switch button. The angle grinder switch is a crucial part that controls the motor’s on/off function, making it an indispensable feature for safe and effective operation.
Over time, this component may wear out or malfunction due to extensive use or other factors, requiring replacement or repair. Angle grinder replacement can be tricky but necessary when faced with problems such as a stuck switch button or damaged parts push.
This guide will outline the necessary steps for replacing the angle grinder switch button, ensuring that readers have access to all information required to tackle this task with confidence and efficiency. With clear instructions and illustrations provided in this guide, readers can easily identify common issues associated with their angle grinders’ switches and take action before they escalate into more significant problems.
Therefore, by following this guide, users can save time and money while extending their tool’s lifespan through regular maintenance practices.
Safety Precautions
Safety is of utmost importance when handling electrical equipment, and this is especially true when it comes to replacing an angle grinder switch.
It is crucial to wear necessary safety gear such as gloves, eye protection, and ear protection in order to prevent injuries.
Additionally, safe work practices should be followed including deactivating the power supply before starting any work on the grinder.
Explain the importance of safety when it comes to handling electrical equipment.
Proper handling of electrical equipment is crucial for preventing potential hazards and ensuring a safe work environment. Electrical equipment can pose various risks, including electric shock, fire, and burns. These dangers can result from inadequate maintenance, misuse or improper handling of the equipment. Therefore, it is essential to follow safety guidelines when using electrical equipment to prevent accidents.
One way to ensure safety when handling electrical equipment is by inspecting the tools before use. Check for any damage such as frayed cords, loose wires or missing grounding prongs that could cause electric shock or start a fire. It is also essential to use personal protective gear such as rubber gloves and goggles when working with electrical equipment.
Additionally, avoid touching the circuitry of the tool while it is still connected to power sources such as batteries or outlets. Proper use and storage of electrical tools are also critical in maintaining their safety features and preventing hazards in the workplace.
By following these precautions and procedures, users can ensure proper handling of electrical equipment and minimize potential injuries caused by mishandling of this type of machinery.
List necessary safety gear needed such as gloves, eye protection, and ear protection.
To ensure a safe work environment when handling electrical equipment, it is important to equip oneself with personal protective gear such as gloves, eye protection, and ear protection. These safety gear items are essential in protecting individuals from potential hazards that may arise during the operation of an angle grinder or any other electrical tool.
The following list highlights three necessary safety gear items that should be worn at all times:
- Gloves: Wearing gloves helps to protect your hands from heat, sparks, and flying debris that may come in contact with them while operating an angle grinder or any other electrical tool.
- Eye Protection: Eye protection shields your eyes from particles and debris that may fly off of the grinding wheel or cutting disc while using an angle grinder.
- Ear Protection: Earplugs or earmuffs help to protect your ears from the loud noise produced by an angle grinder.
It is important to note that these safety gear items should be properly selected and fitted for maximum effectiveness. While wearing gloves, choose a pair made of materials like leather or Kevlar® to prevent cuts and burns. Similarly, when selecting eye protection, make sure they fit snugly around your face without obstructing your vision.
By taking proper precautions and wearing appropriate safety gear like gloves and eye protection when handling electrical equipment like an angle grinder, you can reduce the risk of injury significantly.
Highlight safe work practices such as deactivating power supply.
In order to prevent accidents and ensure a secure work environment, it is important to deactivate the power supply prior to beginning any electrical equipment maintenance or repair. This includes repairing your angle grinder switch button or any other parts that may require replacement.
The first step in deactivating the power supply is locating the circuit breaker and turning off the electricity source for the area where you will be working. It is also important to unplug any cords from outlets or disconnect batteries if applicable.
After ensuring that the power supply has been deactivated, refer to your angle grinder repair manual for specific instructions on how to replace the switch button or other parts. It is crucial to follow these guidelines carefully in order to avoid injury and ensure efficient operation of your equipment.
Additionally, before beginning any repairs, always wear necessary safety gear such as gloves, eye protection, and ear protection as listed in our previous subtopic. By following safe work practices such as deactivating the power supply and wearing protective gear, you can maintain a secure work environment while conducting necessary maintenance on your angle grinder.
Identifying the type of switch
This section will focus on identifying the various types of switches used in angle grinders. Different models may incorporate different types of switches, and it is important to be able to recognize them for safety reasons. Visual aids will be provided to assist in the identification process, with an emphasis on objective descriptions and elimination of personal pronouns.
Identifying the type of switch can be crucial in understanding how to operate the angle grinder safely. Some common types of switches include paddle switches, trigger switches, and dead man switches. Paddle switches are typically located on the body of the grinder and require the user to press down on a large paddle to turn the grinder on. Trigger switches are similar to those found on power drills, where the user must squeeze a trigger to activate the grinder. Dead man switches are designed to turn off the grinder if the user’s hand is removed from the switch, providing an added level of safety.
By understanding the different types of switches, users can choose the best option for their needs and ensure they are using the grinder safely.
Discuss various types of switches used in angle grinders.
The diverse range of switches utilized in modern angle grinders can significantly impact the user’s experience and safety, highlighting the need for a thorough understanding of their mechanisms.
The most common types of switches used in angle grinders include paddle, slide, trigger, and thumb switches.
Paddle switches are typically located on top of the grinder and require the operator to press down on a large paddle with their hand to turn it on/off.
Slide switches operate by sliding forward or backward to engage/disengage power flow.
Trigger switches work similarly to those found on power drills, where pressing down on a button engages power while releasing it disables it.
Thumb switches are similar to trigger switches but require less pressure from the operator’s thumb to activate them.
Understanding which type of switch is used in an angle grinder is critical when replacing or repairing faulty ones.
Provide visual aids to help identify different types and models.
When it comes to replacing the switch in an angle grinder, it is essential to identify the type and model of switch that needs to be replaced. As discussed earlier, there are various types of switches used in angle grinders, including trigger switches, paddle switches, and slide switches. Each switch has its unique features and functions that must be taken into consideration when replacing them.
To help identify different types and models of angle grinder switches, visual aids can be a valuable resource. Here are four examples of visual aids that can assist in identifying the type of switch:
- Diagrams: Diagrams provide a visual representation of the different parts of an angle grinder, including the switch.
- Photos: High-resolution photos can show close-up details of a particular switch model.
- Videos: Videos can offer step-by-step instructions on how to replace a specific switch type.
- User manuals: Most manufacturers include detailed user manuals with their products that include diagrams and instructions on how to replace parts such as the switch.
By using these visual aids, users can accurately identify which type or model of angle grinder switch needs replacement and ensure they purchase or order the correct part needed for repair or replacement purposes.
Removing the old switch
This section will provide step-by-step instructions on how to safely remove the old switch from an angle grinder.
It is important to handle the parts carefully to avoid any damage or injury. Tips on how to handle the parts will also be included in this discussion.
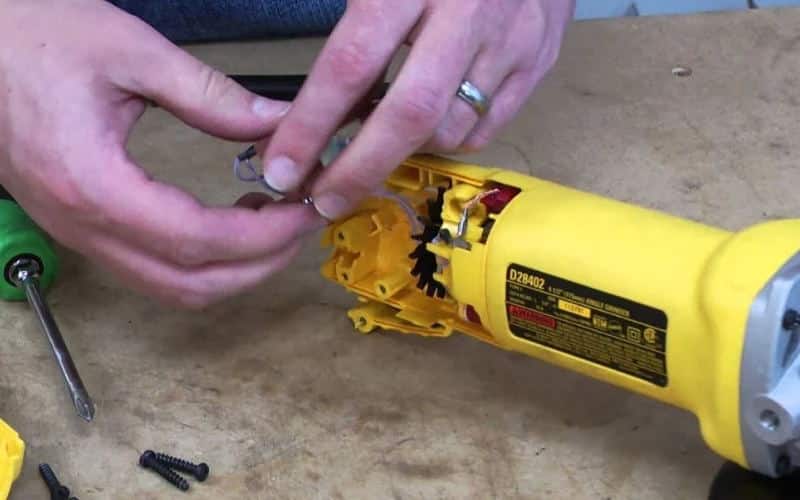
Step-by-step instructions on how to remove the old switch safely.
To safely remove the old switch, begin by unplugging the angle grinder and removing any attached discs or accessories. This is an important step to avoid accidental activation of the tool during the replacement process.
Once the angle grinder is disconnected from its power source, use a screwdriver to carefully remove any screws that secure the switch housing onto the tool body. Take note of where each screw came from as there may be different lengths or types used in different areas.
It is also recommended to wear protective gloves and eyewear during this process to prevent injury from sharp edges or flying debris. As you remove the switch housing, be gentle and avoid applying excessive force that could damage other components within the tool.
Once removed, set aside all parts in a safe location until ready for reinstallation. With these step-by-step instructions, you can safely remove your old angle grinder switch and prepare for its replacement with confidence.
- Nested bullet point list:
- By taking necessary precautions such as unplugging and removing accessories, you are ensuring your safety throughout this process.
- It’s important to handle each screw with care so as not to lose them or misplace them.
- Wearing protective gear such as gloves and eyewear will provide an added layer of protection against any potential hazards while disassembling your angle grinder switch.
Tips on how to handle parts to avoid damage.
The proper handling of parts is critical to preventing damage and ensuring a successful installation process during an angle grinder switch replacement.
When handling the parts, it is important to ensure that they are not dropped or subjected to any kind of impact that may cause them to break. The parts should also be handled with clean hands and without any grease or oil on them that can cause corrosion.
To handle the angle grinder switch replacement parts properly, it is advisable to use gloves and safety glasses. This will not only protect the user from injury but also prevent contamination of the undamaged item.
Additionally, it is important to keep track of all the screws and bolts used during disassembly as they may be different sizes or lengths and need to be put back in their original locations during reassembly.
By taking care when handling parts for an angle grinder switch replacement, users can avoid costly mistakes and ensure a smooth installation process.
Installing New Switch
This section will provide a detailed guide on how to correctly install the new switch for your angle grinder. It is crucial to follow the steps carefully to ensure that the switch is installed properly and functions smoothly.
Additionally, common mistakes during installation will be outlined, along with tips on how to avoid them. By following these guidelines, you can successfully replace your angle grinder’s switch and have it working as good as new.
Detailed steps on installing new switch correctly.
The process of securely fastening the newly acquired angle grinder switch into its designated port involves carefully aligning the necessary wiring and meticulously tightening all associated screws.
To begin, consult the instruction manual or follow a reliable online guide to ensure that you understand the disassembly procedure required for accessing and removing the previous switch.
Once removed, ensure that the wires are correctly aligned with those on the new switch before inserting it into place.
Next, tighten all screws firmly but not excessively to avoid damaging any components or creating additional issues.
After securing the new angle grinder switch in place, test it thoroughly by turning on and off your machine several times while checking for any signs of malfunction or unusual noises.
If everything appears to be working correctly, reassemble any parts that were removed previously and clean up any debris left over from your repair process.
Take care to dispose of old components safely and responsibly according to local regulations.
With proper attention to detail and careful execution of these steps, you can successfully replace an angle grinder switch without encountering significant difficulties or complications.
Outline common mistakes and how to avoid them.
Identifying and avoiding common mistakes during the angle grinder switch replacement process is critical to ensuring a successful repair.
One common error is not disconnecting the power source before beginning the replacement procedure. Failing to do so can result in electrical shock or injury.
Another mistake that people tend to make is rushing through the process without taking enough time to understand how the switch operates. This can lead to incorrectly installed switches, which may cause further damage or even render the tool unusable.
To avoid these types of errors, it’s important to take your time and read through any instructions provided with your new switch carefully. Additionally, be sure to disconnect all power sources before beginning work on your tool.
If you’re unsure about any aspect of the replacement process, consult with an expert or refer to online resources for guidance.
By following these simple steps, you can ensure that your angle grinder switch replacement goes smoothly and results in a fully functional tool that will serve you well for years to come.
Testing the New Switch
After the installation of a new switch, it is crucial to verify if it has been properly installed and functions as intended.
Testing procedures should be conducted to ensure that the switch operates safely and effectively. These procedures may include checking for proper power supply, inspecting wiring connections, and testing the functionality of the switch itself.
Suggest testing procedures after installation.
It is imperative to conduct thorough testing procedures post-installation in order to ensure the proper functioning and safety of the newly installed angle grinder switch replacement. Below are three recommended testing procedures that should be conducted:
- Power Testing: The first step is to test if the new switch is receiving power correctly. Turn on the power supply and use a multimeter or voltage tester to check if there is any output voltage from the switch. If no voltage output is detected, it means that either the wiring connections are incorrect or there could be a fault with the switch.
- Functionality Testing: Once you have confirmed that power flows through the switch, test its functionality by turning it on and off a few times. Observe how smoothly it switches between ON/OFF positions and whether there are any signs of erratic behavior such as flickering lights or intermittent operation.
- Safety Testing: Finally, perform safety tests by running your angle grinder at various speeds while holding it firmly with both hands. Check if there are any vibrations or unusual noises coming from the tool when operated at high speeds- these could indicate loose parts within your machine which need addressing urgently! Additionally, inspect all wiring connections for signs of overheating or wear which can occur over time due to regular usage and exposure to abrasive materials.
By following these recommended testing procedures after installation of an angle grinder switch replacement, you can ensure that your tool operates safely and efficiently without posing any risks to yourself or others around you during usage!
Verify if the new switch has properly been installed, or if further adjustments are necessary.
To ensure optimal performance and safety, it is essential to verify the correct installation of the new component and make any necessary adjustments before using the angle grinder. The first step in verifying proper installation is to check that the switch operates smoothly without any sticking or resistance. If there is any difficulty in turning the switch on or off, or if it feels loose or wobbly, further adjustments are needed.
A helpful tool for checking alignment is a straight edge placed along the top surface of the switch and comparing it to adjacent components. Additionally, inspecting wiring connections for tightness and ensuring they are connected correctly is important. By taking these steps, users can rest assured that their angle grinder switch replacement has been properly installed and adjusted for safe operation.
| Possible Issue | Solution |
|---|---|
| Switch does not turn on/off | Check wiring connections |
| Switch feels loose or wobbly | Tighten mounting screws |
| Switch sticks/resists movement | Adjust position of new switch if necessary |
Conclusion
The final section of this instructional manual provides a summary of the steps necessary to attain optimal performance of the tool, ensuring safe and efficient use for future projects.
After replacing the angle grinder switch using this guide, it is crucial to test the new switch thoroughly before using the tool. This step ensures that everything is functioning correctly and there are no further adjustments needed.
It is also important to note that if any issues arise after following this guide, it may be best to seek professional help or contact customer support from the manufacturer.
In conclusion, replacing an angle grinder switch can seem daunting at first but by following this guide, users can save time and money by fixing their own tools rather than buying new ones. By taking proper safety precautions and carefully following each step outlined in this guide, users can ensure safe and efficient use of their angle grinder for future projects.
Frequently Asked Questions
What if the angle grinder is not turning on even after replacing the switch?
If an angle grinder is not turning on even after replacing the switch, there may be several other factors that could potentially cause the issue. It is possible that there is a problem with the power supply or wiring, which would require further investigation by a professional electrician.
Another possibility is that the motor of the angle grinder has burned out or become damaged, in which case it may need to be replaced entirely. Additionally, it is important to ensure that all components have been properly reassembled after replacing the switch and that any safety features such as blade guards are correctly installed and functioning.
Overall, troubleshooting an angle grinder requires careful attention to detail and a thorough understanding of its various components and mechanisms.
Can I replace the angle grinder switch without any prior technical knowledge?
Replacing an angle grinder switch without any prior technical knowledge may be challenging for some individuals. It requires disassembling the tool, identifying the faulty switch, and installing a new one in its place.
To do this safely and effectively, it is important to have a basic understanding of electrical wiring and equipment. Additionally, following manufacturer instructions and safety precautions is crucial to prevent injury or damage to the tool.
While it may be possible for some individuals to replace the switch on their own, seeking professional assistance from a trained technician is recommended if there is any uncertainty or lack of experience with electrical repairs.
Is it necessary to use the same brand switch as the original one?
When replacing a switch in an angle grinder, it is not always necessary to use the same brand switch as the original one. However, it is important to choose a switch that matches the specifications of the old one and fits properly into the grinder.
Using a different brand switch might affect the performance or safety of the angle grinder if it does not have compatible electrical ratings or configurations. Therefore, it is recommended to consult with a professional or refer to the manufacturer’s guidelines before purchasing and installing a replacement switch for an angle grinder.
How do I know if the switch replacement has been successful?
To determine if a switch replacement for an angle grinder has been successful, one should first ensure that the new switch is compatible with the grinder model and specifications.
Once installed, the grinder should be tested to see if it turns on and off properly when the switch is activated.
Additionally, it is important to check for any unusual noises or vibrations during operation as these could indicate a faulty installation.
It may also be helpful to consult the manufacturer’s instructions or seek professional assistance if there are any concerns about the replacement process or functionality of the new switch.
Ultimately, proper testing and attention to detail can help ensure a successful switch replacement for an angle grinder.
Can I use the angle grinder without a switch if it is not functioning properly?
Using an angle grinder without a functioning switch is not recommended and can be hazardous. The switch serves as a safety feature that allows the user to control the tool’s power output and turn it off when necessary.
If the switch is not working correctly, it can result in unexpected start-up or shut-off of the tool, causing potential harm to the user or surrounding objects. It is crucial to replace a faulty switch promptly or seek professional repair services to ensure safe usage of an angle grinder.
Conclusion
Angle grinders are a useful tool for cutting and grinding various materials. However, if the switch on your angle grinder is not functioning properly, it can be dangerous to use.
In this guide for angle grinder switch replacement, we have outlined the steps you need to take to replace your old switch with a new one. Before beginning any work on your angle grinder, it’s important to take safety precautions. This includes wearing protective gear such as gloves and eye protection and ensuring that the power source is disconnected.
Once you have identified the type of switch needed for your particular model of angle grinder, you can proceed with removing the old switch and installing the new one. It’s imperative that you test the new switch before using your angle grinder again. If everything works correctly, you can safely use your tool without any concerns regarding its functionality or safety.
By following these simple steps in replacing an angle grinder switch, you can ensure that your tool remains functional and safe for use in various applications. In conclusion, replacing an angle grinder switch may seem like a daunting task at first but by following these guidelines carefully and taking all necessary safety measures beforehand; anyone can successfully complete this process themselves without needing professional help or risking injury from faulty switches.
It’s crucial to remember that safety should always be prioritized when working with any power tools in order to avoid accidents or injuries while using them.